
Congratulations!
You invested in a great lawn and cannot wait for the grilling, the lawn games, the clean(er) dog paws and the memories that will be made in your yard.

Pro Tip 2: There are many variables (e.g. water pressure, hose size, type of sprinkler, etc.) that affect water output from your system, so it is important to measure the amount of water your system applies. Put a rain gauge or a flat-bottomed can (such as a tuna can) a few feet from your sprinkler head and time how long it takes to catch a 1/4 inch of water.
Don’t worry, the time for all that fun is nearly here. But first you need to help your transplanted sod thrive. How you care for newly laid sod is crucial in making sure you have a naturally dark green, thick and luxurious low-maintenance lawn long-term.
WATERING:
The First Day: Newly installed sod must be watered immediately upon installation to prevent wilting. During hot and dry weather, wetting the bare soil first can help to reduce stress for the plant, but this step is not as important as working quickly, efficiently, and watering well as soon as the pieces are on the ground. Ideally, a sod project will have one person laying sod while a second person waters.
Once installation is completed or a larger area is done, set up a sprinkler to ensure even watering.
Pro Tip 1: Water edges of the project and areas near buildings, driveways, and sidewalks more often due to the added stresses of wind and reflected heat on the plants.
Because the sod was just harvested, it has a very short root system and lacks the ability to pull moisture from the lower soil profile to stay cool and green. Watch closely for signs of stress, such as graying or wilting leaves, and apply water as needed. If you have a large area, move sprinklers frequently enough so all the turf gets some water.
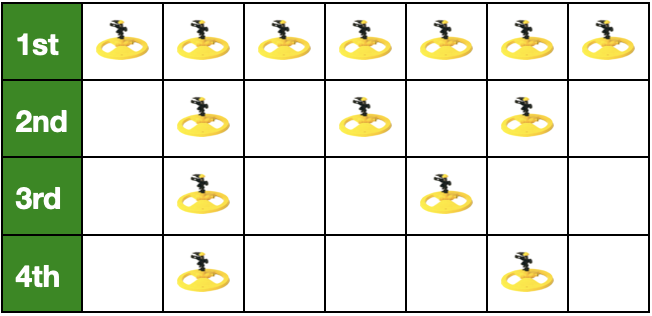
The First Month: Pictured is the watering schedule for the first month. Each row is a week after installation; each column is a day of the week; each sprinkler icon represents 1/4” of water applied during the heat of the day.
Watering The First Week: Your new sod needs a 1/4 inch of water each day. For a newly installed lawn, the best time to water is during the heat of the day. Read here for best watering practices for mature lawns.
The First Month: In the second week your lawn needs a 1/4 inch of water every other day. Water every third day the third week. Water every fourth day the fourth week. (See the chart on the right if you are the visual type.) Obviously, if Mother Nature decides to help you out during this time you are off the hook!

A wilted lawn. Note how the leaves of the grass fold in on themselves to help reduce surface area exposed to the sun. Wilted grass will appear gray in color and will not spring back up after you walk across it. After moisture, these plants will unfold in a beautiful demonstration of why grasses are an amazing part of life on plant Earth.
What to Remember: It will take years for the roots to grow to their full depth of several feet - so be prepared to water if your juvenile grass looks wilted in the coming years. Once established, your lawn requires minimal maintenance to retain its beautiful appearance. Your lawn will always have the genetic potential to look as good as it did the day it first arrived. If you are having difficulties maintaining your lawn to a level you enjoy, contact us at any time and we will happily give you coaching.
Watch out for the following signs your lawn needs more moisture 1) You see lingering footprints after walking across the lawn 2) The blades are folded or rolled 3) The grass is a bluish/gray color and wilting. All of these symptoms are clearly depicted in the photo on the right.
MOWING:

You should plan to mow your new sod the second week after installation. Mowing controls leaf growth and encourages root development. Only mow when your lawn is dry after watering (but not stressed from the heat). For both new sod and mature lawns you should avoid mowing during the heat of the day or in times of extreme heat or drought.
Never remove more than 1/3 of the grass blade. Our Masterblend sod can be trained down to a height of 1/4” in height (for golf course tees, for example), but a typical homeowner would most appreciate it between 3.5” - 4.0”. For lots and lots of excellent pro tips on best mowing practices, read here.
FEEDING:
Apply a starter fertilizer at the time of installation to speed root development and save time and water. We carry and recommend 13-13-13 (Triple 13) because we love it. It is easiest to apply a starter fertilizer directly to the soil prior to installation, but you can apply fertilizer over the top of the lawn after installation. After 4 weeks, reapply 13-13-13 fertilizer and continue every month until you are satisfied with the look of your new lawn. For long-term care, check out our feeding programs, and information on aeration, and sign up for our newsletter or our classes for conditions-specific advice.
USE & LONG-TERM CARE:
During the first two weeks, avoid heavy or concentrated use of your new lawn. This will give the roots an opportunity to firmly knit with the soil. Once the roots have knitted, you are good to go!
Finally, remember juvenile lawns have different needs than mature lawns. Check out this very popular newsletter article for a detailed description of what the next few years will look like in terms of lawn care.
